Getting Started: Build Your First Multi-Agent Software
This tutorial guides you through the process of building a distributed multi-agent application using LangGraph and leveraging Agent Connect Protocol (ACP) and other AGNTCY components and tools.
The sample app used for this tutorial is a Marketing Campaign Manager agent. A “pre-cooked” version of this application is available here.
For this tutorial we are using LangGraph, but other frameworks can also be used.
Overview
The Marketing Campaign Manager we are building implements a LangGraph graph which:
Interacts with a user to gather the description of the email marketing campaign to launch.
Uses an already existing Mail Composer Agent, capable of composing emails for the marketing campaign. This agent is written using LangGraph, it provides an Agent Manifest which allows to deploy it through the Agent Workflow Server and be consumed through ACP.
Uses an already existing Email Reviewer Agent capable of reviewing an email and adjust it for a specific target audience. This agent is written using LlamaIndex and similarly to the previous agent, it provides a Agent Manifest which allows to deploy it through the Agent Workflow Server and be consumed through ACP.
Uses Twilio Sendgrid API to deliver the marketing campaign email to the intended recipient. We will consume this API leveraging the capabilities of the API Bridge Agent.
This tutorial is structured in the following steps:
Create a Basic LangGraph Skeleton Application: Set up a LangGraph application structure to serve as the base of your multi-agent software.
Generate Models from Agent Manifests: Use agent manifests to generate models defining data structures and interfaces.
State Definition: Create states to manage the flow of your multi-agent software (MAS).
Multi-Agent Application Development: Use ACP SDK to integrate ACP nodes into your LangGraph application.
API Bridge Integration: Connect natural language outputs to structured API requests.
I/O Mapper Integration: Adapt inputs and outputs between different agents such that they match in format and meaning.
Generate Application Manifest: Create a manifest file to define how your application can be deployed and consumed via ACP.
Review Resulting Application: Analyze the complete workflow and how all components interact with one another.
Execute Application through Workflow Server Manager: Deploy and test the multi-agent system using Workflow Server Manager.
Prerequisites
Step 1: Create a Basic LangGraph Skeleton Application
Let’s start by setting up our project environment. You can either use pip to install the required packages or Poetry for dependency management.
Setting up the project
First, create a new project using Poetry:
# Create a new Poetry project
poetry new --python='>=3.9,<4.0' marketing-campaign
cd marketing-campaign
At this point, it’s recommended to open the project folder in your favorite IDE for a better development experience.
Install the dependencies:
# Add all dependencies
poetry add python-dotenv langgraph langchain-openai langchain agntcy-acp

# Install the current project (marketing-campaign) and dependencies
poetry install
Building a Simple LangGraph Skeleton
Now let’s begin by setting up a simple LangGraph skeleton application with the following nodes:
Start, Mail Composer, Email Reviewer, Send Mail, and End

This setup is a basic framework with placeholders for each task in the workflow. It sets the stage for transforming these nodes into remote ACP nodes, allowing the interaction with real remote agents.
The ultimate goal of this application is to compose and review emails that will be sent to a mail recipient. Each node represents a task to be performed in this process, from composing the email to reviewing it, and finally sending it.
Skeleton Code Example
To create the initial structure of our application (skeleton), we need to create a Python file that defines our LangGraph application with placeholder nodes. This serves as the foundation that we’ll enhance later with ACP integration.
Let’s create a file named app.py in the src/marketing_campaign/ directory with the following content:
# app.py
from langgraph.graph import StateGraph, START, END
from langgraph.graph.state import CompiledStateGraph
from pydantic import BaseModel, Field
from typing import Optional, List

# Define the overall state with placeholders for future use
class OverallState(BaseModel):
    messages: List[str] = Field([], description="Chat messages")
    has_composer_completed: Optional[bool] = Field(None, description="Flag indicating if the mail composer has successfully completed its task")
    mailcomposer_output: Optional[str] = Field(None, description="Output from Mail Composer")
    email_reviewer_output: Optional[str] = Field(None, description="Output from Email Reviewer")
    sendgrid_result: Optional[str] = Field(None, description="Result from SendGrid API call")

def mail_composer(state: OverallState) -> OverallState:
    # Placeholder logic for composing mail
    print("Composing mail...")
    state.mailcomposer_output = "Draft email content"
    state.has_composer_completed = True
    return state

def email_reviewer(state: OverallState) -> OverallState:
    # Placeholder logic for reviewing email
    print("Reviewing email...")
    state.email_reviewer_output = "Reviewed email content"
    return state

def send_mail(state: OverallState) -> OverallState:
    # Placeholder logic for sending email
    print("Sending email...")
    state.sendgrid_result = "Email sent successfully"
    return state

# Build the state graph with placeholder nodes
def build_app_graph() -> CompiledStateGraph:
    sg = StateGraph(OverallState)

    # Add placeholder nodes
    sg.add_node(mail_composer)
    sg.add_node(email_reviewer)
    sg.add_node(send_mail)

    # Define the flow of the graph
    sg.add_edge(START, mail_composer.__name__)
    sg.add_edge(mail_composer.__name__, email_reviewer.__name__)
    sg.add_edge(email_reviewer.__name__, send_mail.__name__)
    sg.add_edge(send_mail.__name__, END)

    graph = sg.compile()
    print("Graph compiled successfully.")
    return graph

# Compile and skeleton graph
graph = build_app_graph()
Let’s run our code to make sure everything works as expected:
poetry run python src/marketing_campaign/app.py
You should see the output:
"Graph compiled successfully."
Step 2: Generate Models from Agent Manifests
In this step, you will generate models based on the agent manifests to define the input, output and config schemas for each agent involved in MAS. The models are created using the acp generate-agent-models cli command, which reads the agent manifest files and produces Python files that encapsulate the agent’s data structures and interfaces necessary for integration.
What is an Agent Manifest?
An Agent Manifest is a detailed document outlining an agent’s capabilities, deployment methods, data structure specifications and dependencies on other agents. It provides essential information for ensuring agents can communicate and work together within the Agent Connect Protocol and Workflow Server ecosystem. Learn more
Schema and Type Generation
We will use two agents whose manifests
are provided within the Agentic Apps repository. To proceed, let’s download the manifest files:
# Create a manifests directory to store the agent manifests
mkdir -p manifests

# Download Mail Composer Manifest
curl -o manifests/mailcomposer.json https://raw.githubusercontent.com/agntcy/agentic-apps/refs/heads/main/mailcomposer/deploy/mailcomposer.json

# Download Email Reviewer Manifest
curl -o manifests/email_reviewer.json https://raw.githubusercontent.com/agntcy/agentic-apps/refs/heads/main/email_reviewer/deploy/email_reviewer.json
Now, we can generate the models using the acp command-line tool that was installed as part of our dependencies:
# Generate models for Mail Composer
poetry run acp generate-agent-models manifests/mailcomposer.json --output-dir ./src/marketing_campaign --model-file-name mailcomposer.py

# Generate models for Email Reviewer
poetry run acp generate-agent-models manifests/email_reviewer.json --output-dir ./src/marketing_campaign --model-file-name email_reviewer.py
These commands create the necessary Python files containing the Pydantic models for interacting with these agents.
Model File Structure:
Pydantic Models: Each file includes Pydantic models that represent the configuration, input, and output schemas, enforcing type validation.
Input, Output and Config Schemas: These schemas handle incoming and outgoing data and the configuration of the agent.
Step 3: State Definition
State management is fundamental to track progress and outcomes so that each agent can interact effectively with others following the right workflow. In this step, we will define the states necessary to manage the flow of your multi-agent software.
Understanding State in Multi-Agent Systems
State in multi-agent systems refers to the structured data that represents the current status of the application. It includes information about the inputs, outputs, and intermediate results of each agent’s operations. Effective state management allows for the coordination and synchronization of agent activities.
State Definition in the Marketing Campaign Example
Create a file named state.py in the src/marketing_campaign/ directory that will hold state definitions for the MAS:
# src/marketing_campaign/state.py
from pydantic import BaseModel, Field
from typing import List, Optional
from marketing_campaign import mailcomposer
from marketing_campaign import email_reviewer

class ConfigModel(BaseModel):
    recipient_email_address: str = Field(..., description="Email address of the email recipient")
    sender_email_address: str = Field(..., description="Email address of the email sender")
    target_audience: email_reviewer.TargetAudience = Field(..., description="Target audience for the marketing campaign")

class MailComposerState(BaseModel):
    input: Optional[mailcomposer.InputSchema] = None
    output: Optional[mailcomposer.OutputSchema] = None

class MailReviewerState(BaseModel):
    input: Optional[email_reviewer.InputSchema] = None
    output: Optional[email_reviewer.OutputSchema] = None

class OverallState(BaseModel):
    messages: List[mailcomposer.Message] = Field([], description="Chat messages")
    operation_logs: List[str] = Field([],
                                      description="An array containing all the operations performed and their result. Each operation is appended to this array with a timestamp.",
                                      examples=[["Mar 15 18:10:39 Operation performed: email sent Result: OK",
                                                 "Mar 19 18:13:39 Operation X failed"]])

    has_composer_completed: Optional[bool] = Field(None, description="Flag indicating if the mail composer has succesfully completed its task")
    has_reviewer_completed: Optional[bool] = None
    has_sender_completed: Optional[bool] = None
    mailcomposer_state: Optional[MailComposerState] = None
    email_reviewer_state: Optional[MailReviewerState] = None
    target_audience: Optional[email_reviewer.TargetAudience] = None
The ConfigModel defines the configuration parameters for the Marketing Campaign application:
recipient_email_address: Specifies who will receive the email (target recipient)sender_email_address: Defines the email address that will appear in the “From” fieldtarget_audience: Provides details about the audience the email is intended for, allowing the Email Reviewer to optimize content appropriately
After creating the state file, replace the imports in your app.py file with:
# Replace all imports at the top of src/marketing_campaign/app.py with:
from langgraph.graph import StateGraph, START, END
from langgraph.graph.state import CompiledStateGraph
from marketing_campaign.state import OverallState

# IMPORTANT: Remove the
# class OverallState(BaseModel):
# definition. Rest of your code remains the same
# ...
Important: When updating your application, make sure to remove the placeholder
OverallStateclass defined in Step 1 and import the state classes from your newstate.pyfile. This ensures your application uses the proper state definitions that incorporate the agent models generated from the manifests in Step 2.
With this state definition in place, your application now has a structured approach for managing the flow of data between agents:
The
OverallStateclass captures the complete state of the applicationThe individual component states (
MailComposerState,MailReviewerState) handle the specific data requirements for each agent.
The next step involves transforming our placeholder nodes into actual ACP nodes for remote agent integration.
Step 4: Multi-Agent Application Development
Now, let’s enhance the skeleton setup by transforming LangGraph nodes into ACP nodes using agntcy_acp sdk. ACP nodes allow network communication between agents by using the Agent Connect Protocol (ACP).
This enables remote invocation, configuration, and output retrieval with the goal of allowing heterogeneous and distributed agents to interoperate.
Why Use ACP?
Remote Execution: ACP nodes run on a Agent Workflow Server, making it possible to execute tasks remotely.
Technology Independence: ACP allows agents to be implemented in various technologies, such as LangGraph, LlamaIndex, etc., without compatibility issues.
Interoperability: ACP ensures that agents can communicate and work together, regardless of the underlying technology, by adhering to a standardized protocol. Learn more about ACP
Add Mail Composer and Email Reviewer ACP Nodes
To integrate the Mail Composer and Email Reviewer as ACP nodes, update the src/marketing_campaign/app.py file by adding the following imports at the top of the file:
# Add these imports at the top of src/marketing_campaign/app.py
import os
from marketing_campaign import mailcomposer
from marketing_campaign import email_reviewer
from agntcy_acp import ApiClientConfiguration
from agntcy_acp.langgraph.acp_node import ACPNode
Then, add the client configuration for the remote agents below your imports:
# Below your imports, fill in client configuration for the remote agents
MAILCOMPOSER_AGENT_ID = os.environ.get("MAILCOMPOSER_ID", "")
EMAIL_REVIEWER_AGENT_ID = os.environ.get("EMAIL_REVIEWER_ID", "")
mailcomposer_client_config = ApiClientConfiguration.fromEnvPrefix("MAILCOMPOSER_")
email_reviewer_client_config = ApiClientConfiguration.fromEnvPrefix("EMAIL_REVIEWER_")
Next, define the ACP nodes to replace our placeholder functions:
# Mail Composer ACP Node
acp_mailcomposer = ACPNode(
    name="mailcomposer",
    agent_id=MAILCOMPOSER_AGENT_ID,
    client_config=mailcomposer_client_config,
    input_path="mailcomposer_state.input",
    input_type=mailcomposer.InputSchema,
    output_path="mailcomposer_state.output",
    output_type=mailcomposer.OutputSchema,
)

# Email Reviewer ACP Node
acp_email_reviewer = ACPNode(
    name="email_reviewer",
    agent_id=EMAIL_REVIEWER_AGENT_ID,
    client_config=email_reviewer_client_config,
    input_path="email_reviewer_state.input",
    input_type=email_reviewer.InputSchema,
    output_path="email_reviewer_state.output",
    output_type=email_reviewer.OutputSchema,
)
Note: The
_pathfields indicate where to find the input and output in theOverallState, while the_typefields specify the type of the input and output.
Finally, update the build_app_graph function to use these ACP nodes instead of the placeholder functions:
# Update your build_app_graph function
def build_app_graph() -> CompiledStateGraph:
    sg = StateGraph(OverallState)

    # Replace placeholder nodes with ACP nodes
    sg.add_node(acp_mailcomposer)
    sg.add_node(acp_email_reviewer)
    sg.add_node(send_mail)  # We'll replace this with an API Bridge Agent node in Step 5

    # Define the flow of the graph
    sg.add_edge(START, acp_mailcomposer.get_name())
    sg.add_edge(acp_mailcomposer.get_name(), acp_email_reviewer.get_name())
    sg.add_edge(acp_email_reviewer.get_name(), send_mail.__name__)
    sg.add_edge(send_mail.__name__, END)

    graph = sg.compile()
    print("Graph compiled successfully.")
    return graph
Step 5: API Bridge Integration
The API Bridge converts natural language outputs into structured API requests. The input to the API Bridge is in natural language, but APIs like SendGrid APIs require specifically structured formats. The API Bridge ensures that the correct endpoint and request format are used.
For more detailed information about the API Bridge Agent implementation and configuration, please refer to the API Bridge documentation.
Add SendGrid API Bridge Node
To integrate the SendGrid API Bridge into our src/marketing_campaign/app.py file, add the following imports at the top of your file (along with the previous imports):
# Add these imports at the top of src/marketing_campaign/app.py
from agntcy_acp.langgraph.api_bridge import APIBridgeAgentNode
Then add the SendGrid configuration below the existing agent configurations, replacing the placeholder send_mail function:
# Remove the placeholder send_mail function in src/marketing_campaign/app.py
# and replace it with this APIBridgeAgentNode:

# Instantiate APIBridge Agent Node
SENDGRID_HOST = os.environ.get("SENDGRID_HOST", "http://localhost:8080")
sendgrid_api_key = os.environ.get("SENDGRID_API_KEY", None)
if sendgrid_api_key is None:
    raise ValueError("SENDGRID_API_KEY environment variable is not set")

send_email = APIBridgeAgentNode(
    name="sendgrid",
    input_path="sendgrid_state.input",
    output_path="sendgrid_state.output",
    service_api_key=sendgrid_api_key,
    hostname=SENDGRID_HOST,
    service_name="sendgrid/v3/mail/send"
)
Explanation:
The
_pathfields indicate where to find the input and output in theOverallState, as explained in Step 4.The
service_namefield specifies the endpoint manually (sendgrid/v3/mail/send). However, the API Bridge can automatically determine the correct endpoint based on the natural language request if this field is not provided. Learn more
Finally, update your build_app_graph function to replace the placeholder send_mail function defined in Step 1 with the new send_email API Bridge node:
# Update your build_app_graph function
def build_app_graph() -> CompiledStateGraph:
    sg = StateGraph(OverallState)

    # Replace placeholder nodes with ACP nodes
    sg.add_node(acp_mailcomposer)
    sg.add_node(acp_email_reviewer)
    sg.add_node(send_email)  # Replace the placeholder send_mail with the API Bridge

    # Define the flow of the graph
    sg.add_edge(START, acp_mailcomposer.get_name())
    sg.add_edge(acp_mailcomposer.get_name(), acp_email_reviewer.get_name())
    sg.add_edge(acp_email_reviewer.get_name(), send_email.get_name())
    sg.add_edge(send_email.get_name(), END)

    graph = sg.compile()
    print("Graph compiled successfully.")
    return graph
For a complete setup guide including Tyk gateway configuration and SendGrid API details, see the SendGrid API Bridge example in the ACP SDK documentation.
Step 6: I/O Mapper Integration
In this section, we will explore how to handle inputs and outputs effectively within the workflow. Managing the flow of data between agents allows to maintain the integrity of the process.
To achieve this, we not only add the I/O Mapper, a powerful tool that automatically transforms outputs from one node to match the input requirements of the next using an LLM, but also introduce additional nodes to demonstrate how to perform manual mapping. This combination showcases both automated and manual approaches to handle the state within the application.
What is I/O Mapper?
I/O Mapper is a component that ensures compatibility between agents by transforming outputs to meet the input requirements of subsequent agents. It addresses both format-level and semantic-level compatibility by leveraging an LLM to perform tasks such as:
JSON Structure Transcoding: Remapping JSON dictionaries.
Text Summarization: Reducing or refining text content.
Text Translation: Translating text between languages.
Text Manipulation: Reformulating or extracting specific information.
For more details on I/O Mapper functionality and implementation, see the official I/O Mapper documentation.
I/O Processing Overview
Among the three nodes added so far, some additional nodes are required to handle input and output transformations effectively. Specifically, as shown in Marketing Campaign MAS, the following nodes were added:
process_inputs: Processes the user’s input, updates theOverallState, and initializes themailcomposer_statewith messages to ensure they are correctly interpreted by themailcomposer. It also checks if the user has completed their interaction (e.g., input is “OK”), which means the user is satisfied about the composed email.prepare_sendgrid_input: This node prepares the input for the SendGrid API. It constructs a query in natural language to send an email, using the corrected email content from theemail_reviewerand configuration details like the recipient and sender email addresses.prepare_output: This node consolidates the outputs of the application. It updates theOverallStatewith the final email content and logs the result of the email send operation.
To make this tutorial code fully functional, we need to add implementations for the processing nodes mentioned above:
First, update the
src/marketing_campaign/state.pyfile to include a SendGridState definition:# src/marketing_campaign/state.py # Add these imports from agntcy_acp.langgraph.api_bridge import APIBridgeOutput, APIBridgeInput # Add SendGridState class along with existing state classes class SendGridState(BaseModel): input: Optional[APIBridgeInput] = None output: Optional[APIBridgeOutput]= None
Then, update
OverallStateclass to includesendgrid_stateinsrc/marketing_campaign/state.py:class OverallState(BaseModel): # Add sendgrid_state to OverallState messages: List[mailcomposer.Message] = Field([], description="Chat messages") operation_logs: List[str] = Field([], description="An array containing all the operations performed and their result. Each operation is appended to this array with a timestamp.", examples=[["Mar 15 18:10:39 Operation performed: email sent Result: OK", "Mar 19 18:13:39 Operation X failed"]]) has_composer_completed: Optional[bool] = Field(None, description="Flag indicating if the mail composer has succesfully completed its task") has_reviewer_completed: Optional[bool] = None has_sender_completed: Optional[bool] = None mailcomposer_state: Optional[MailComposerState] = None email_reviewer_state: Optional[MailReviewerState] = None target_audience: Optional[email_reviewer.TargetAudience] = None sendgrid_state: Optional[SendGridState] = None # Add this line
Subsequently, update imports at the top of your
src/marketing_campaign/app.pyfile:# src/marketing_campaign/app.py # Update import to include SendGridState from marketing_campaign.state import OverallState, MailComposerState, SendGridState # Add these imports import copy from agntcy_acp.langgraph.api_bridge import APIBridgeAgentNode, APIBridgeInput from langchain_core.runnables import RunnableConfig
Finally, implement the processing nodes in
src/marketing_campaign/app.py:# Add these processing nodes to src/marketing_campaign/app.py def process_inputs(state: OverallState, config: RunnableConfig) -> OverallState: cfg = config.get('configurable', {}) user_message = state.messages[-1].content if user_message.upper() == "OK": state.has_composer_completed = True else: state.has_composer_completed = False state.target_audience = email_reviewer.TargetAudience(cfg["target_audience"]) state.mailcomposer_state = MailComposerState( input=mailcomposer.InputSchema( messages=copy.deepcopy(state.messages), is_completed=state.has_composer_completed ) ) return state def prepare_sendgrid_input(state: OverallState, config: RunnableConfig) -> OverallState: cfg = config.get('configurable', {}) state.sendgrid_state = SendGridState( input=APIBridgeInput( query=f"" f"Please send an email to {cfg['recipient_email_address']} from {cfg['sender_email_address']}.\n" f"Content of the email should be the following:\n" f"{state.email_reviewer_state.output.corrected_email if (state.email_reviewer_state and state.email_reviewer_state.output and hasattr(state.email_reviewer_state.output, 'corrected_email') ) else ''}" ) ) return state def prepare_output(state: OverallState, config: RunnableConfig) -> OverallState: state.messages = copy.deepcopy( state.mailcomposer_state.output.messages if (state.mailcomposer_state and state.mailcomposer_state.output and state.mailcomposer_state.output.messages ) else [] ) if state.sendgrid_state and state.sendgrid_state.output and state.sendgrid_state.output.result: state.operation_logs.append(f"Email Send Operation: {state.sendgrid_state.output.result}") return state
Conditional Edge with I/O Mapper
The edge between the mailcomposer and subsequent nodes is a conditional edge. This edge uses the check_final_email function to determine the next step to be executed. The condition works as follows:
If the user input is not “OK”, the graph transitions to the
prepare_outputnode, allowing the user to interact with themailcomposeragain.If the user input is “OK”, the graph transitions to the
email_reviewernode and continues through the workflow.
The conditional edge is implemented with the I/O Mapper, which ensures that the outputs of one node are transformed to match the input requirements of the next node. Here’s how to implement the conditional edge in src/marketing_campaign/app.py:
Add LLM client for the I/O Mapper. In this example we’re using
AzureChatOpenAI, but you can use any LLM client supported by LangChain:# Add LLM client to src/marketing_campaign/app.py from langchain_openai.chat_models.azure import AzureChatOpenAI # Initialize LLM for the I/O Mapper llm = AzureChatOpenAI( model="gpt-4o-mini", api_version="2024-07-01-preview", seed=42, temperature=0, )
Define the conditional edge function in
src/marketing_campaign/app.py:# Add conditional edge function to src/marketing_campaign/app.py def check_final_email(state: OverallState): """Determine whether to proceed to email review or continue user interaction. Returns: "done": If the mailcomposer has produced a final email "user": If we need to continue interacting with the user """ return "done" if (state.mailcomposer_state and state.mailcomposer_state.output and state.mailcomposer_state.output.final_email ) else "user"
Next, update the
build_app_graphfunction insrc/marketing_campaign/app.pyto include our new nodes and theadd_io_mapped_conditional_edgeedge:# Add import for I/O Mapper in src/marketing_campaign/app.py from agntcy_acp.langgraph.io_mapper import add_io_mapped_conditional_edge # Update build_app_graph def build_app_graph() -> CompiledStateGraph: sg = StateGraph(OverallState) # Add all nodes to the graph sg.add_node(process_inputs) sg.add_node(acp_mailcomposer) sg.add_node(acp_email_reviewer) sg.add_node(send_email) sg.add_node(prepare_sendgrid_input) sg.add_node(prepare_output) # Define the initial flow sg.add_edge(START, "process_inputs") sg.add_edge("process_inputs", acp_mailcomposer.get_name()) # Add conditional edge between mailcomposer and either email_reviewer or END, adding io_mappers between them add_io_mapped_conditional_edge( sg, start=acp_mailcomposer, path=check_final_email, iomapper_config_map={ "done": { "end": acp_email_reviewer, "metadata": { "input_fields": ["mailcomposer_state.output.final_email", "target_audience"] } }, "user": { "end": "prepare_output", "metadata": None } }, llm=llm ) # Define the remaining flow for the "done" path sg.add_edge(acp_email_reviewer.get_name(), "prepare_sendgrid_input") sg.add_edge("prepare_sendgrid_input", send_email.get_name()) sg.add_edge(send_email.get_name(), "prepare_output") sg.add_edge("prepare_output", END) graph = sg.compile() print("Graph compiled successfully.") return graph
Explanation of Parameters and Workflow Behavior:
start=acp_mailcomposer: Specifies the starting node for the conditional edge, which is themailcomposer.path=check_final_email: This is the function that determines the condition for the edge. It returns either"done"or"user"."done"indicates that the user is satisfied with the composed email, so to go to theemail_reviewer."user"indicates that the user is not satisfied, and move towardsprepare_outputto log the results and loops back to the user.
"input_fields": ["mailcomposer_state.output.final_email", "target_audience"]: Specifies what to map:"mailcomposer_state.output.final_email": Automatically takes thefinal_emailoutput from themailcomposerand maps it to the input defined in the manifest of theemail_reviewer"target_audience": is populated duringprocess_inputsfrom the configuration, required byemail_reviewer
Note: All paths specified in the
input_fieldsare rooted in theOverallState
With these additions, our application now has a complete workflow that can:
Process user inputs and initialize states
Compose emails with the Mail Composer agent
Route based on user feedback using conditional edges
Review emails with the Email Reviewer agent when needed
Prepare and send emails using the SendGrid API Bridge
Provide meaningful output back to the user
Step 7: Generate Application Manifest
In this step, we will generate the Agent Manifest for our Marketing Campaign application. The manifest generation enables our application to be used by other applications and to be deployed through an Agent Workflow Server.
Why Generate an Agent Manifest?
Reusability: The manifest allows your MAS to be used as a dependency in other applications, so as to allow modular and composable agent architectures.
Deployment: It provides the necessary information for the Workflow Server Manager to deploy and run your application along with its dependencies.
Documentation: It serves as a self-documenting artifact that describes your agent’s capabilities, configuration options, and dependencies.
Creating the Manifest Generator
Let’s create a new file called generate_manifest.py in the src/marketing_campaign/ directory:
# src/marketing_campaign/generate_manifest.py
from pathlib import Path
from pydantic import AnyUrl
from marketing_campaign.state import OverallState, ConfigModel
from agntcy_acp.manifest import (
    AgentManifest,
    AgentDeployment,
    DeploymentOptions,
    LangGraphConfig,
    EnvVar,
    AgentMetadata,
    AgentACPSpec,
    AgentRef,
    Capabilities,
    SourceCodeDeployment,
    AgentDependency
)

mailcomposer_dependency_manifest = "./manifests/mailcomposer.json"
email_reviewer_dependency_manifest = "./manifests/email_reviewer.json"

manifest = AgentManifest(
    metadata=AgentMetadata(
        ref=AgentRef(name="org.agntcy.marketing-campaign", version="0.0.1", url=None),
        description="Offer a chat interface to compose an email for a marketing campaign. Final output is the email that could be used for the campaign"),
    specs=AgentACPSpec(
        input=OverallState.model_json_schema(),
        output=OverallState.model_json_schema(),
        config=ConfigModel.model_json_schema(),
        capabilities=Capabilities(
            threads=False,
            callbacks=False,
            interrupts=False,
            streaming=None
        ),
        custom_streaming_update=None,
        thread_state=None,
        interrupts=None
    ),
    deployment=AgentDeployment(
        deployment_options=[
            DeploymentOptions(
                root = SourceCodeDeployment(
                    type="source_code",
                    name="source_code_local",
                    url=AnyUrl("file://."),
                    framework_config=LangGraphConfig(
                        framework_type="langgraph",
                        graph="marketing_campaign.app:graph"
                    )
                )
            )
        ],
        env_vars=[EnvVar(name="AZURE_OPENAI_API_KEY", desc="Azure key for the OpenAI service"),
                  EnvVar(name="AZURE_OPENAI_ENDPOINT", desc="Azure endpoint for the OpenAI service"),
                  EnvVar(name="SENDGRID_API_KEY", desc="Sendgrid API key")],
        dependencies=[
            AgentDependency(
                name="mailcomposer",
                ref=AgentRef(name="org.agntcy.mailcomposer", version="0.0.1", url=f"file://{mailcomposer_dependency_manifest}"),
                deployment_option = None,
                env_var_values = None
            ),
           AgentDependency(
                name="email_reviewer",
                ref=AgentRef(name="org.agntcy.email_reviewer", version="0.0.1", url=f"file://{email_reviewer_dependency_manifest}"),
                deployment_option = None,
                env_var_values = None
            )
        ]
    )
)

with open(f"{Path(__file__).parent.parent.parent}/manifests/marketing-campaign.json", "w") as f:
    json_content = manifest.model_dump_json(
        exclude_unset=True,
        exclude_none=True,
        indent=2
    )
    # Replace URLs with filesystem paths because file:// schema not yet supported on dependencies
    json_content = json_content.replace(
        f"file://{mailcomposer_dependency_manifest}",
        mailcomposer_dependency_manifest
    )
    json_content = json_content.replace(
        f"file://{email_reviewer_dependency_manifest}",
        email_reviewer_dependency_manifest
    )
    f.write(json_content)
Understanding the Manifest Generator Structure
Let’s break down the components of our manifest generator:
Metadata: Defines basic information as unique name of the agent (
org.agntcy.marketing-campaign), its version number, and a human-readable description explaining its purpose or functionality.Specs: Establishes how the agent communicates by defining expected input/output formats using
OverallStateJSON schemas, configuration options throughConfigModel, and supported capabilities.Deployment: This section contains deployment-related information:
deployment_options: Defines how the agent can be deployedurl=AnyUrl("file://."): Specifies that the source code is located in the current directory (relative to where the manifest is being used)framework_config: Specifies that this is a LangGraph application with the graph defined inmarketing_campaign.app:graph
env_vars: Lists the environment variables required by the marketing campaign.dependencies: Lists the agents that our application depends on. Each dependency specifies:The local name used to refer to the dependency
The reference to the agent manifest file (
./manifests/mailcomposer.json)
Generating the Manifest
Now, let’s run our script to generate the manifest:
# Install the current project
poetry install

# Run the manifest generator
poetry run python src/marketing_campaign/generate_manifest.py
This will create a file called marketing-campaign.json in the manifests directory, which contains all the information needed for:
Using our Marketing Campaign application as a dependency in other applications
Deploying and running our application through the Workflow Server Manager
We’ll focus on the second point and see how to execute our application using the Workflow Server Manager.
Step 8: Review Resulting Application
Below is the final graph that represents the complete process of composing, reviewing, and sending an email. This graph shows how agents are connected, how inputs and outputs are processed, and how the application adapts dynamically based on user interactions.
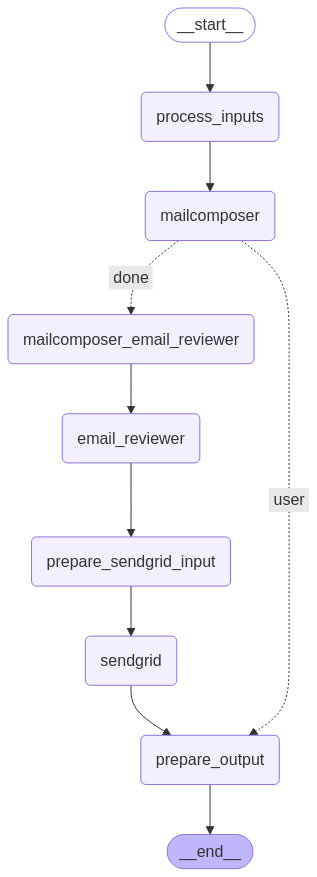
Our completed application now implements a robust workflow where:
The MAS begins with the process_inputs node and transitions to the mailcomposer node, where the email draft is created. A conditional edge allows the user to interact with the mailcomposer until they are satisfied with the composed email. Once confirmed, the workflow proceeds through the following nodes in sequence:
email_reviewer: Reviews and refines the email content.prepare_sendgrid_input: Prepares the input for the SendGrid API.sendgrid: Sends the email using the SendGrid API.prepare_output: Consolidates the final output and logs the result.
This application review highlights the importance of input and output transformations, the role of the I/O Mapper in ensuring compatibility between agents, and the flexibility provided by conditional edges to adapt the workflow dynamically. With this architecture, the system achieves a robust and user-friendly process for managing email campaigns.
Step 9: Execute Application through Workflow Server Manager
After generating the manifest, we can deploy and run our application using the Workflow Server Manager. This allows us to execute the entire multi-agent system as a distributed application with all dependencies properly managed.
Installing the Workflow Server Manager
First, download the Workflow Server Manager CLI appropriate for your operating system from the releases page. Make sure to execute these commands from the root directory of your project:
# For macOS with Apple Silicon (run from project root)
curl -L https://github.com/agntcy/workflow-srv-mgr/releases/download/v0.1.1/wfsm0.1.1_darwin_arm64.tar.gz -o wfsm.tar.gz
tar -xzf wfsm.tar.gz # Keep the extracted wfsm binary it in the project root
chmod +x wfsm
# For other platforms, download the appropriate binary from the releases page
Follow these instructions to install the Agent Workflow Server Manager
Configuring the Application Environment
Before starting the workflow server, create a configuration file that provides the necessary environment variables for the marketing-campaign application and its dependencies. Create a file named marketing_campaign_config.yaml in your project root directory:
# marketing_campaign_config.yaml
values:
  AZURE_OPENAI_API_KEY: your_secret
  AZURE_OPENAI_ENDPOINT: "the_url.com"
  API_HOST: 0.0.0.0
  SENDGRID_HOST: http://host.docker.internal:8080
  SENDGRID_API_KEY: SG.your-api-key
dependencies:
  - name: mailcomposer
    values:
      AZURE_OPENAI_API_KEY: your_secret
      AZURE_OPENAI_ENDPOINT: "the_url.com"
  - name: email_reviewer
    values:
      AZURE_OPENAI_API_KEY: your_secret
      AZURE_OPENAI_ENDPOINT: "the_url.com"
Note: Replace placeholder values with your actual API keys and endpoints. The
SENDGRID_HOSTis set tohttp://host.docker.internal:8080to allow communication with a API Bridge service that will locally run in Docker.
Setting Up the SendGrid API Bridge
Before testing the full application workflow, you need to set up the SendGrid API Bridge locally. Follow the detailed guide in the API Bridge documentation for complete instructions.
Deploying the Application
Now, deploy the Marketing Campaign workflow server using the manifest we generated. Run this command from the root directory of your project:
./wfsm deploy -m ./manifests/marketing-campaign.json -e ./marketing_campaign_config.yaml
If the deployment is successful, you’ll see output similar to:
2025-03-28T12:31:04+01:00 INF ---------------------------------------------------------------------
2025-03-28T12:31:04+01:00 INF ACP agent deployment name: org.agntcy.marketing-campaign
2025-03-28T12:31:04+01:00 INF ACP agent running in container: org.agntcy.marketing-campaign, listening for ACP request on: http://127.0.0.1:62609
2025-03-28T12:31:04+01:00 INF Agent ID: eae32ada-aaf8-408c-bf0c-7654455ce6e3
2025-03-28T12:31:04+01:00 INF API Key: 08817517-7000-48e9-94d8-01d22cf7d20a
2025-03-28T12:31:04+01:00 INF ---------------------------------------------------------------------
Take note of the Agent ID, API Key, and Host information, as you’ll need them to interact with the deployed application.
Testing the Application with ACP Client
To test our application, we’ll use an ACP client that allows us to communicate with the deployed workflow server:
Download the client script by running the following command from the root of the project:
# Download the ACP client example from the agntcy/agentic-apps repository
curl https://raw.githubusercontent.com/agntcy/agentic-apps/refs/heads/main/marketing-campaign/src/marketing_campaign/main_acp_client.py -o src/marketing_campaign/main_acp_client.py
Set the environment variables with the information from your deployment logs:
export MARKETING_CAMPAIGN_HOST="http://localhost:62609"  # Use the host from your logs
export MARKETING_CAMPAIGN_ID="eae32ada-aaf8-408c-bf0c-7654455ce6e3"  # Use your actual Agent ID
export MARKETING_CAMPAIGN_API_KEY='{"x-api-key": "08817517-7000-48e9-94d8-01d22cf7d20a"}'  # Use your actual API Key

# Configuration of the application
export RECIPIENT_EMAIL_ADDRESS="recipient@example.com"
export SENDER_EMAIL_ADDRESS="sender@example.com" # Sender email address as configured in SendGrid
Run the ACP client:
poetry run python src/marketing_campaign/main_acp_client.py
Interact with the application:
Describe the marketing campaign email you want to compose
Refine the email content through conversation with the Mail Composer agent
Type “OK” when you’re satisfied with the draft
The Email Reviewer agent will review and improve the email for your target audience
The email will be sent to the specified recipient via SendGrid
Through this client interaction, you can experience the complete workflow of our multi-agent system, from email composition to delivery, with all the intermediate processing steps handled automatically.
The Workflow Server Manager makes it easy to deploy and run complex multi-agent applications, handling the dependencies, environment configuration, and communication between components.
Conclusion
In this tutorial, we demonstrated how to build a complete Multi-Agent System (MAS) using the ACP SDK. Starting from a basic LangGraph skeleton application, we progressively:
Integrated remote agents using ACP nodes
Defined states to manage data flow between components
Implemented advanced features such as the I/O Mapper and API Bridge integration
Generated a deployable manifest for our application
Executed our application through the Workflow Server Manager
These components allowed us to create a dynamic and flexible workflow that ensures compatibility between agents, adapts to user interactions, and can be deployed as a complete distributed system.
By following this approach, you can design and implement your own MAS tailored to specific use cases, leveraging the power of ACP to enable communication and collaboration between distributed agents.